What to Know Before Meeting Your Sunroom Contractor: Complete Planning Guide
Getting a sunroom installed is one of the better home investments you can make in Bryan-College Station. The anticipation is real. But showing up to your first contractor meeting without a clear picture of what you want is one of the most common ways homeowners slow the process down or end up with a room that doesn’t quite fit their life.
The good news is that you don’t need to have every detail figured out. A good sunroom contractor in Bryan College Station will walk you through a lot of this together. What helps most is arriving with answers to the big questions already in mind, so the conversation can focus on solutions instead of starting from scratch.
This guide covers exactly what to think through before that first meeting. If you’re ready to get the conversation started now, reach out to the Sunspace Texas team for a free, no-pressure consultation.
What Your Contractor Actually Needs From You
Here’s the honest answer to how much you need to plan before you meet with a contractor: enough to describe what you want, where you want it, how you’ll use it, and roughly what you can spend. That’s it. Everything else can be worked out together.
Your contractor brings the technical expertise. You bring the vision. The better you can articulate your vision, the smoother the project goes from the first conversation to installation day.
1. Decide Where You Want the Sunroom
Location is the first thing your contractor needs to know. It affects structural planning, sun exposure, views, and cost. Without it, they can’t give you an accurate estimate or a realistic installation plan.
A few things worth thinking through before your meeting:
- Which side of your home gets the best views? A sunroom that faces your backyard, a garden, or an open yard will feel completely different from one that faces a fence line or a neighbor’s wall.
- What’s the sun’s orientation? East-facing rooms get morning light and stay cooler in the afternoon. West-facing rooms capture evening light and sunsets. South-facing rooms get the most consistent sun across the day. North-facing rooms stay the coolest.
- Is there an existing porch, patio, or deck? If yes, this is often the most practical starting point. Building around an existing structure reduces complexity and cost.
- What’s in the surrounding area? Trees and shrubs that currently provide shade or privacy are worth factoring in. You may want to keep them, or you may need to trim them before installation begins.
There’s no universally right answer here. It depends on your home’s layout, your yard, and how you picture yourself actually using the room.
2. Know How You Plan to Use the Space
This is the most important question you can answer before your meeting. How you plan to use the sunroom shapes everything else: the size you need, the type of room that makes sense, the features that matter, and the location that works best.
Think about which of these feels closest to how you’d use it:
- A daily living space: A breakfast nook, a sitting room, or a place to have morning coffee, comfort, and year-round usability matter most here
- A home office or study area: natural light, separation from the main living areas, and consistent temperature control are key
- A playroom for kids: You’ll want open floor space, easy-to-clean surfaces, and good visibility from the house
- An entertainment area: For hosting guests; size, flow from the kitchen or main living area, and weather protection are priorities
- A personal retreat: For reading, yoga, hobbies, or quiet time; softer lighting options and privacy matter more
- An indoor garden or plant room: maximum natural light and a floor that handles moisture and soil easily
Your intended use directly affects which type of sunroom fits your needs. A room you plan to use daily in July needs insulation and climate control. A room you’ll primarily use for spring and fall entertaining may not. Getting clear on this before you walk in the door saves you time and helps your contractor give you useful options rather than generic ones.
3. Understand the Sunroom Types Available
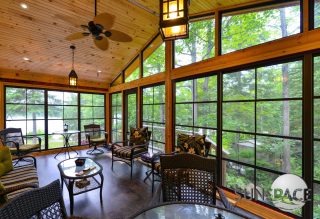
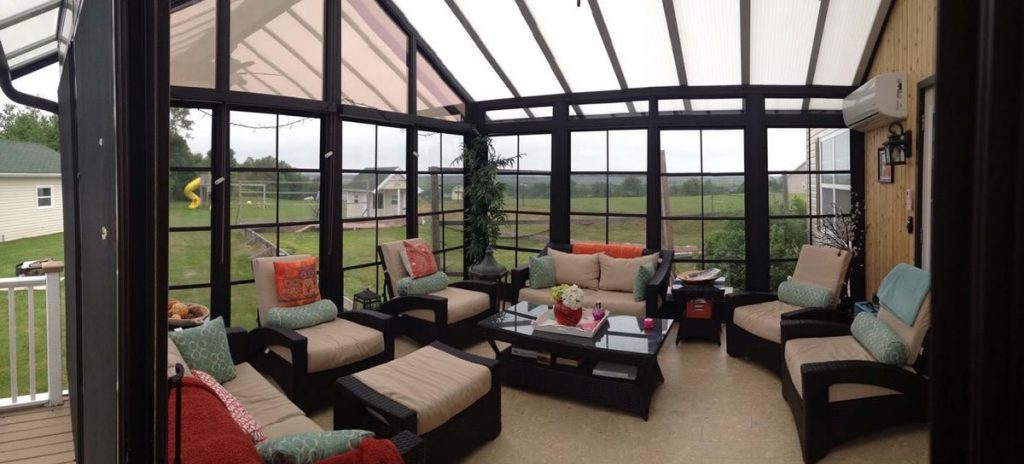
You don’t need to have made a final decision before your consultation, but knowing the basic options means you won’t feel lost when your contractor walks you through them. At Sunspace Texas, there are four main models, each suited to different needs and budgets.
| Model | Type | Best For |
| Model 100 | Screen Room | Pest protection, open-air feel, budget-conscious projects |
| Model 200 | WeatherMaster with Vinyl Windows | Flexible, open, or enclosed feel is the most popular option |
| Model 300 | 3-Season Glass Sunroom | Spring through fall use, single-glazed glass, aluminum framing |
| Model 400 | All-Season Insulated Sunroom | Year-round comfort, double-glazed low-E windows, full insulation |
In Texas specifically, the distinction between the 3-season and all-season models matters more than it would in a milder climate. Without insulation and climate control, a sunroom can become too hot to use from June through September, roughly four months of the year. If year-round usability is your goal, the all-season model is the one to plan around. For a detailed breakdown of how these two options compare, our guide on 3-season vs. all-season sunrooms covers the full picture.
4. Think Through Your Budget Before You Go In
You don’t need an exact number, but you should go into the meeting with a realistic range in mind. Knowing your budget upfront helps your contractor point you toward options that actually work for your situation, rather than spending time on models that won’t fit.
A few things worth keeping in mind as you think this through:
- Upfront cost vs. long-term value: A lower-cost screen room or 3-season room may seem like the practical choice, but if you end up frustrated by the months when it’s not usable, you haven’t actually gotten the value you were looking for. Sometimes spending a bit more for the all-season model is the better decision over the life of the room.
- Financing is an option: Many homeowners don’t realize this until the conversation with their contractor. Spreading the cost into manageable monthly payments can make a higher-quality room much more accessible than the sticker price suggests. Sunspace Texas offers financing plans, so it’s worth asking about before you decide to settle on a lower-budget option.
- Installation complexity affects cost: Building around an existing porch or patio is typically less expensive than starting from scratch. If you have an existing structure to work with, mention it early; it could change the estimate meaningfully.
5. Consider Your Flooring Preference

This one often catches homeowners off guard. The windows and structure get most of the early attention, but flooring is part of the planning conversation too. What you put on the floor affects how the room feels, how easy it is to maintain, and how well it holds up over time.
Common sunroom flooring options and when each makes sense:
- Tile: Practical, durable, and easy to clean. A good fit for indoor gardens, pet-friendly rooms, or any space that’ll see a lot of activity. It can feel cold underfoot in winter.
- Wood or wood laminate: Warm, visually appealing, and popular for sunrooms used as living or dining spaces. Works well in insulated rooms where the temperature stays consistent.
- Carpet: Softer underfoot and better for rooms used as playrooms or quiet retreats. Less practical if moisture or heavy traffic is a factor.
- Concrete or paver-style flooring: Works well for rooms that extend from an existing patio or for a more transitional indoor/outdoor feel.
Your intended use is the best guide here. A kids’ playroom benefits from a softer or more forgiving surface. An indoor garden needs something that handles water and dirt easily. A home office or sitting room can work with almost anything.
6. Check Your HOA Rules and Permit Requirements
This step is easy to forget in the excitement of planning, but it’s worth doing before your first meeting so there are no surprises later.
HOA regulations: If your neighborhood has a homeowners association, check whether sunrooms or home additions require approval before installation begins. Some HOAs have restrictions on the size, placement, or exterior appearance of additions. Getting clarity on this early avoids delays or costly changes later.
Building permits: Most sunroom installations in Bryan-College Station that add livable square footage require a building permit. In most cases, your contractor handles the permitting process as part of the project. Still, it’s worth confirming this explicitly before any work begins. Ask directly: “Will you handle the permits, and what’s included?” A reputable contractor will give you a clear answer.
7. Know What to Ask Your Contractor
Arriving with a few prepared questions makes the consultation more productive and helps you evaluate whether the contractor is the right fit. Here are the most useful ones to ask:
- What sunroom models do you offer, and which would you recommend for my intended use?
- What does the warranty cover, and for how long? A quality manufacturer like Sunspace offers a limited lifetime warranty, which is worth asking about specifically.
- Will you handle the permits? Confirm this explicitly.
- What’s the typical timeline from order to installation? At Sunspace Texas, it’s typically five to seven weeks from order to installation-ready, with installation itself usually completed in about one day, depending on project complexity.
- Do you offer financing? If budget is a factor, ask early.
- Do you conduct an in-home consultation before finalizing the plan? This one matters. A contractor who wants to commit to a project without seeing your home first is a warning sign. The nuances of your specific space, the existing structure, the yard, and the sun exposure, all should be seen firsthand before any plan is finalized.
8. Plan for Installation Day
Once you’ve placed your order and have a confirmed installation date, a little preparation on your end makes the day go smoothly.
- Decide whether you’ll be home: You don’t have to be there, but if you plan to leave, make sure you’ve left contact information with the installation team in case they need to reach you.
- Clear the work area: Move outdoor furniture, potted plants, or anything else near the installation site so the team has clear access.
- Keep kids and pets away from the work area: Installation days involve tools, materials, and activities that aren’t safe for little ones or curious pets to be near.
- Know your questions ahead of time: If you have specific questions about how the room will connect to your home, ask them before installation begins rather than mid-project.
The installation itself is typically a one-day process for most sunroom models. You’ll go to bed with a project in progress and wake up with a finished room. That’s one of the genuine advantages of choosing a sunroom over a traditional room addition.
Quick Planning Checklist
Use this before your contractor meeting to make sure you’ve thought through the essentials:
- Identified the preferred location for the sunroom on your property
- Noted any existing porch, patio, or deck that could be the starting point
- Decided on the primary intended use for the room
- Thought through how often you’ll use it and in which seasons
- Established a realistic budget range
- Checked HOA rules if applicable
- Consider your flooring preference
- Written down questions to ask the contractor
You don’t need every box checked before you make the call. But working through this list ahead of time means your first conversation with a contractor is a productive one rather than a starting-from-scratch one.
Frequently Asked Questions
How much planning do I really need to do before meeting a sunroom contractor?
Enough to describe your vision, your intended use, your preferred location, and your general budget range. Your contractor handles the technical planning. The more clearly you can describe what you want and how you’ll use the space, the more useful the consultation will be.
Will the contractor handle building permits?
In most cases, yes. A reputable contractor includes permit handling as part of the project. Always confirm this explicitly in your first conversation rather than assuming it’s covered.
What if I’m in an HOA?
Check your HOA guidelines before your consultation. Some associations require approval for home additions and have specific rules about placement, size, or exterior materials. Getting this information early avoids delays after you’ve already committed to a project.
How long does sunroom installation take?
From the time you place your order to installation-ready is typically five to seven weeks. The installation itself usually takes about one day, though it can vary based on project complexity.
Do I need to be home during installation?
Not necessarily. If you plan to be away, leave contact information with the installation team. If you stay home, keep children and pets clear of the work area throughout the day.
What’s the most important decision I need to make before the consultation?
How do you plan to use the room? Everything else, the type, size, location, and features, flows from that answer. A contractor can give you a much more useful recommendation once they know whether you’re building a daily home office, a kids’ playroom, a seasonal entertaining space, or something else entirely.
Should I get multiple estimates?
It’s reasonable to compare a few options, but focus on comparing value and quality rather than just cost. A cheaper sunroom that needs repairs within a few years or that only works comfortably for five months of the year isn’t actually a better deal. Look at what’s included, what the warranty covers, and whether the contractor conducts an in-home consultation before committing.
At Sunspace Texas, we’ve been helping Bryan-College Station homeowners plan and install sunrooms, porch enclosures, and outdoor living spaces for over a decade. If you’re getting ready to take the next step, contact us today to schedule your free in-home consultation. We’ll walk you through everything from model options to timeline and financing, no pressure, just honest guidance.